以下のプラグインを使ってみる記録。
Stability

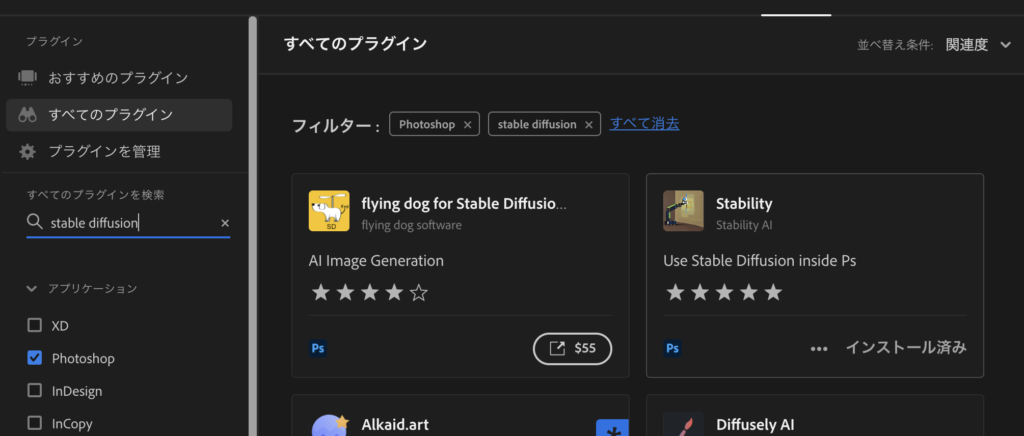
photoshopのプラグイン>プラグインを参照 で Stable Diffusion でプラグイン検索でも出てくる

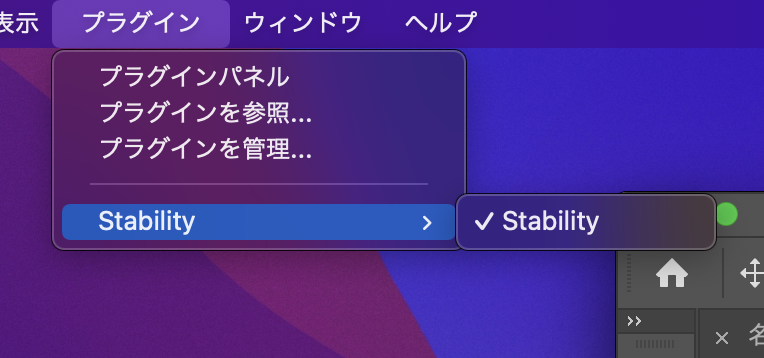
入れると、photoshopのプラグイン>にStabilityが出てくる
出てきたStabilityウィンドウのAPI key タブにてDream Studio APIかローカルか選べる。
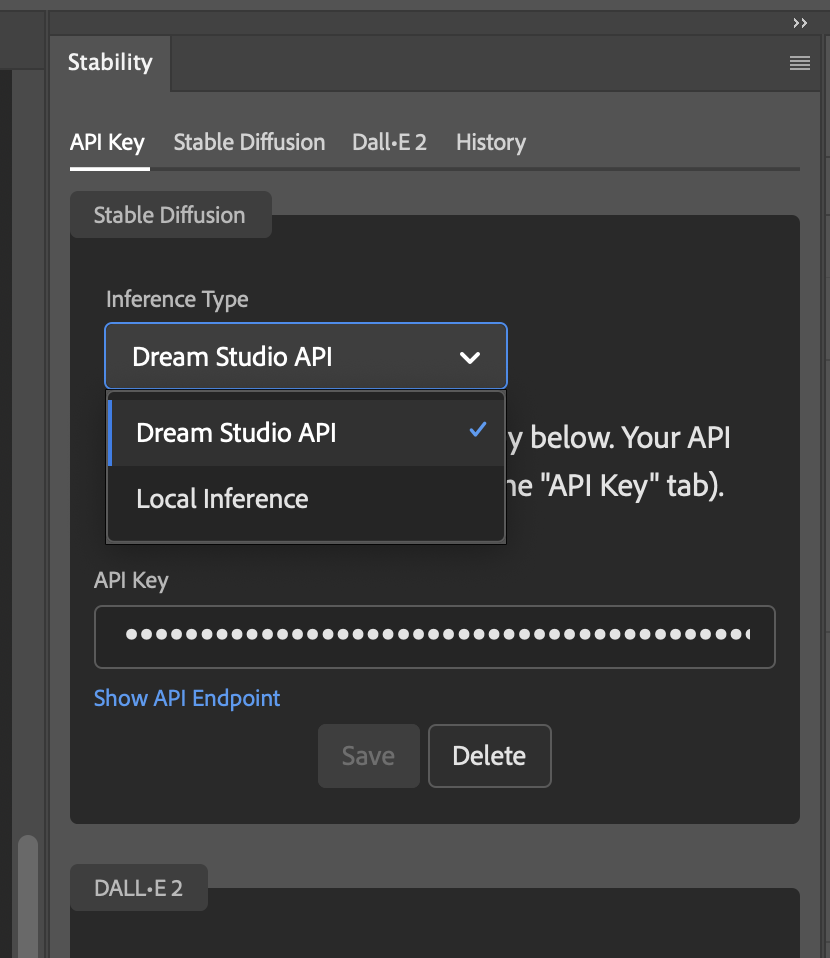
→Dream Studio API
簡単。以下の動画が参考になりました。
https://beta.dreamstudio.ai/へ行ってアカウント作ってAPI keyを作ってそれをコピペする。
ただし無料枠がめっちゃ少ない。たくさん使うには課金が必要。
ということで、ローカル環境構築にチャレンジ!
stable diffusion ローカル環境構築
このプラグインの作者ページ https://christiancantrell.com/#ai-ml
によると、Stable Diffusion API Serverが必要ということなので書いてあるとおりにやってみる。
1. Install Python.
Pythonのインストール。以下のページが参考になりました。
上記の前段のHomebrewのインストールは前回の記事も参考になるかと思います。
Mac M1ではうまくバージョンが切り替わらないです。
Mac M1ではPathの設置が違うようです。以下のようにしてください。export PYENV_ROOT="$HOME/.pyenv" export PATH="$PYENV_ROOT/shims:$PATH" eval "$(pyenv init -)"https://itstudio.co/2021/02/05/11213/
2. Install Conda.
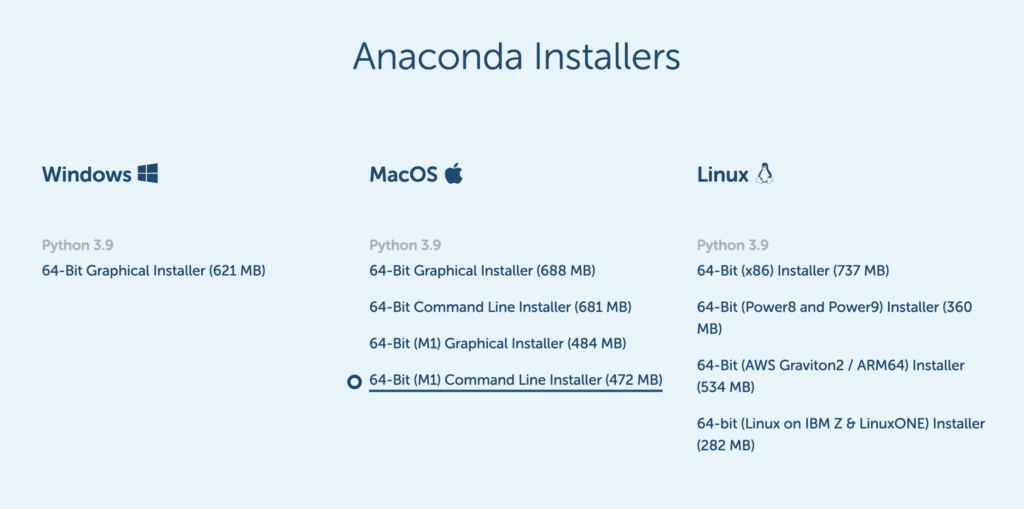
anacondaをインストールしました。
ページの中ほどに以下のリンクがあるのでダウンロード。
その後のインストール方法は以下が参考になります。

下記にも記載。
bash /Users/[ユーザー名]/Downloads/Anaconda3-2022.10-MacOSX-arm64.shでインストール開始。途中yesのnoで答えたり、規約の部分はEnter押し続けて表示したり。
↓
環境変数の追加。
echo 'export PATH=~/anaconda3/bin:$PATH"' >> ~/.zshrc
echo 'export PATH="/opt/anaconda3/bin:$PATH"' >> ~/.zshrc
echo 'eval "$(conda init - zsh)"' >> ~/.zshrc
初期状態のアップデート
conda update -n base -c defaults conda3. Download this repo.
リポジトリをダウンロード
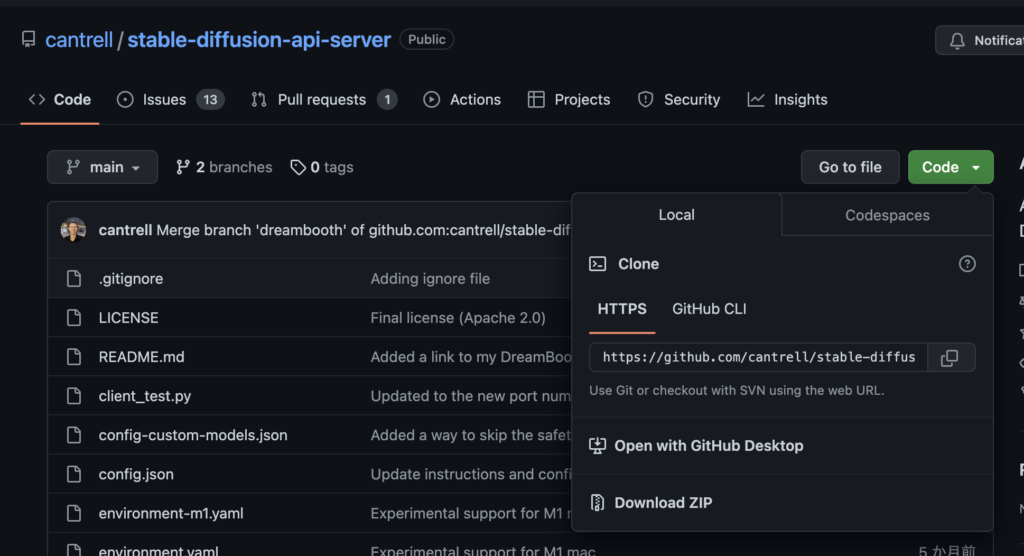
4, cd into the repo’s directory.
ダウンロードしたファイルのディレクトリに移動する。ターミナルで。
cd パス名ちなみにFinderで右クリック+Optionでパスをコピーできる
5. Set up a Conda environment named sd-api-server by running the following command:
以下のコマンドでad-api-serverという名前のConda環境をセットアップします?
M1 Macs:
% conda env create -f environment-m1.yamlエラー!!!
Solving environment: failed

ResolvePackageNotFound:
  - pip=20.3
  - python=3.8.5
python –version でインストールされているpythonのバージョンを確認できる。3.11.2いれてた。だから良くない!?
→pyenv install 3.8.5 でインストールする。→pyenv global 3.8.5でデフォルトにする→python –versionで確認する(pyenv versionsでインストールされている一覧が見れる)
→3.8.5にしてもダメ、同じエラー。pyenv global 3.11.2に戻す。
pipを調べてそれも合わせるか。pip -V で現状確認
pip 22.2.2 from /Users/unitedcube/anaconda3/lib/python3.9/site-packages/pip (python 3.9)
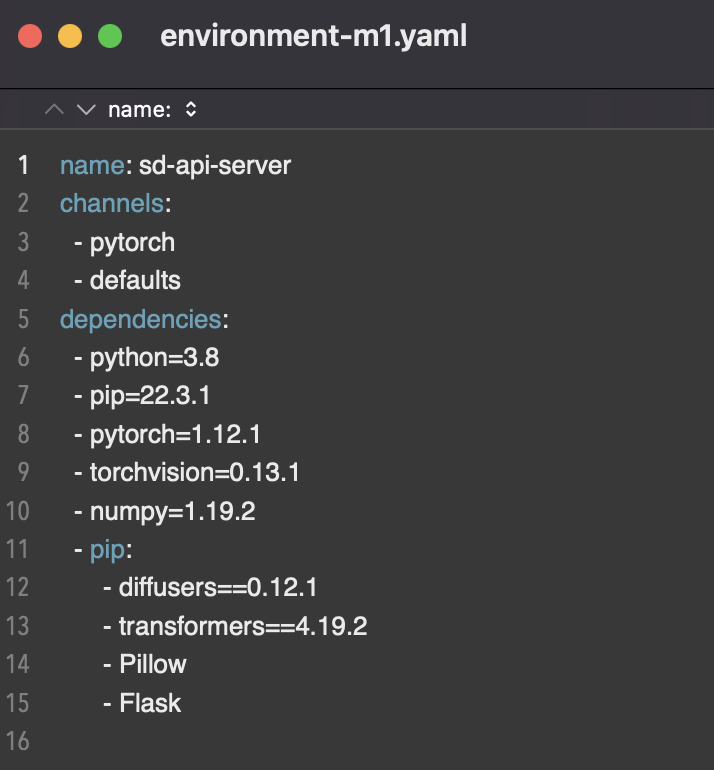
environment-m1.yaml の中身を自分の環境に合わせて書き換えてしまう
参考:https://zenn.dev/ktakayama/articles/6c627e0956f32c
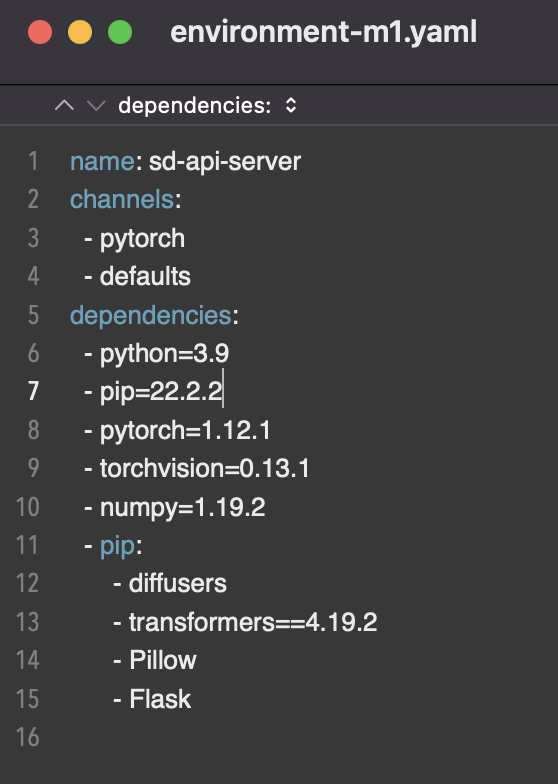
さっきのエラーは出なくなった、Pip failedだけど言われた通りpip install –upgrade pip して23.0.1にアップグレード。environment-m1.yamlも変える。
If you are using an outdated pip version, it is possible a prebuilt wheel is available for this package but pip is not able to install from it. Installing from the wheel would avoid the need for a Rust compiler.

      To update pip, run:

          pip install --upgrade pip

      and then retry package installation.

      If you did intend to build this package from source, try installing a Rust compiler from your system package manager and ensure it is on the PATH during installation. Alternatively, rustup (available at https://rustup.rs) is the recommended way to download and update the Rust compiler toolchain.
      [end of output]

  note: This error originates from a subprocess, and is likely not a problem with pip.
  ERROR: Failed building wheel for tokenizers
ERROR: Could not build wheels for tokenizers, which is required to install pyproject.toml-based projects

failed

CondaEnvException: Pip failed
pipのアップグレードでもダメだったので書いてある通りhttps://rustup.rsからrestupをインストール
info: downloading installer
Welcome to Rust!
This will download and install the official compiler for the Rust
programming language, and its package manager, Cargo.
Rustup metadata and toolchains will be installed into the Rustup
home directory, located at:
/Users/unitedcube/.rustup
This can be modified with the RUSTUP_HOME environment variable.
The Cargo home directory is located at:
/Users/unitedcube/.cargo
This can be modified with the CARGO_HOME environment variable.
The cargo, rustc, rustup and other commands will be added to
Cargo’s bin directory, located at:
/Users/unitedcube/.cargo/bin
This path will then be added to your PATH environment variable by
modifying the profile files located at:
/Users/unitedcube/.profile
/Users/unitedcube/.bash_profile
/Users/unitedcube/.zshenv
You can uninstall at any time with rustup self uninstall and
these changes will be reverted.
Current installation options:
default host triple: x86_64-apple-darwin
default toolchain: stable (default)
profile: default
modify PATH variable: yes
1) Proceed with installation (default)
2) Customize installation
3) Cancel installation
>
To get started you may need to restart your current shell.
This would reload your PATH environment variable to include
Cargo’s bin directory ($HOME/.cargo/bin).
To configure your current shell, run:
source “$HOME/.cargo/env”
以下をシエルに追加。全部いらないかも
echo 'export RUSTUP_ROOT="$HOME/.rustup"' >> ~/.zshrc
echo 'export CARGO_ROOT="$HOME/.cargo"' >> ~/.zshrc
echo 'export PATH="$HOME/.cargo/bin:$PATH"' >> ~/.zshrc
echo 'export PATH="$HOME/.cargo/env:$PATH"' >> ~/.zshrc
echo 'eval "$(rustup init -)"' >> ~/.zshrc
echo 'eval "$(cargo init -)"' >> ~/.zshrc
ターミナルを再起動して
conda env create -f environment-m1.yaml
一度クリエイトしている場合はアップデート
conda env update -f environment-m1.yaml
いけた!
Hugging Face Configuration
説明のとおり、https://huggingface.co/settings/tokens のアカウントを作成して、tokenを作って、ローカルのconfig.jsonの”your_hugging_face_token”の部分にkeyを貼り付ける
M1 Mac Additional Instructions
説明の通りに以下を実行
% conda install pytorch torchvision -c pytorch-nightly
% conda deactivate
% conda activate sd-api-server
% python3 server.py
最後のpython3 server.pyでエラー
ImportError: cannot import name ‘SAFE_WEIGHTS_NAME’ from ‘transformers.utils’
→https://github.com/CompVis/stable-diffusion/issues/627 を参考にenvironment-m1.yamlの「diffusers」を編集 –> 「diffusers==0.12.1」にしてサーバーのアップデート
% conda env update -f environment-m1.yaml
% conda activate sd-api-server
再度トライしたら別のエラーになった。。
ImportError: dlopen(/Users/unitedcube/anaconda3/envs/sd-api-server/lib/python3.9/site-packages/tokenizers/tokenizers.cpython-39-darwin.so, 0x0002): tried: '/Users/unitedcube/anaconda3/envs/sd-api-server/lib/python3.9/site-packages/tokenizers/tokenizers.cpython-39-darwin.so' (mach-o file, but is an incompatible architecture (have (x86_64), need (arm64e)))
〜〜〜
RuntimeError: Failed to import transformers.tokenization_utils because of the following error (look up to see its traceback):
dlopen(/Users/unitedcube/anaconda3/envs/sd-api-server/lib/python3.9/site-packages/tokenizers/tokenizers.cpython-39-darwin.so, 0x0002): tried: '/Users/unitedcube/anaconda3/envs/sd-api-server/lib/python3.9/site-packages/tokenizers/tokenizers.cpython-39-darwin.so' (mach-o file, but is an incompatible architecture (have (x86_64), need (arm64e)))
https://github.com/huggingface/tokenizers/issues/712 より
It may also be defaulting to the wrong toolchain. You might also try setting the default toolchain with
rustup default stable-aarch64-apple-darwin
I think I also had to delete rust-toolchain as when it was present it would change to the x86_64 toolchain. You can check to make sure the right one is selected with
rustup toolchain list
Edit: I was able to fix the rust-toolchain issue by doing
rustup set default-host aarch64-apple-darwin→まだ治らない
Have you tried:
pip uninstall psutil
followed by:
pip install --no-binary :all: psutil
→まだなおらない
conda install -c conda-forge lxmlpip uninstall lxml
ARCHFLAGS="-arch arm64" pip install lxml --compile --no-cache-dirhttps://qiita.com/hayato0311/items/f5c7ca4c030de5858da1 yori
sudo arch -arm64e gem install ffi
→直らない。
次やること
ナイトリー ビルド をやめてみる
→Condaを削除して最初からやり直す
やり直し
Condaのアンインストール https://hogelog.com/python/anaconda_uninstall.html
pythonのインストール 一応 https://www.python.jp/install/macos/install_python.html
$ brew install python3

$ python3 -m pip install pillow
restupインストール時の追加pathも削除
バージョン確認
 ~ % python --version
Python 3.8.5
o ~ % pip -V
pip 23.0.1 from /Users/unitedcube/.pyenv/versions/3.8.5/lib/python3.8/site-packages/pip (python 3.8)
Condaのインストール
以下にしてみた python3.8のminiconda https://docs.conda.io/en/latest/miniconda.html の Miniconda3 macOS Apple M1 ARM 64-bit pkg
完了→バージョン確認
 ~ % python --version
Python 3.8.16
 ~ % pip -V
pip 22.3.1 from /Users/unitedcube/miniconda3/lib/python3.8/site-packages/pip (python 3.8)
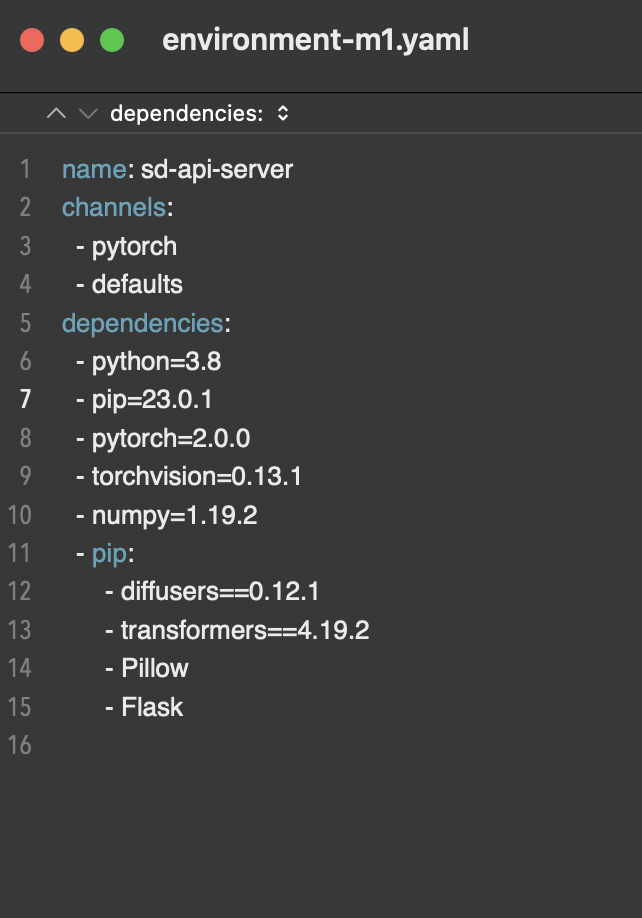
yamlファイルの変更
環境構築
conda env create -f environment-m1.yamlconda activate sd-api-server完了 Method 2: Environment Variablesのナイトリービルドを使用しない方法で実行
% conda env config vars set PYTORCH_ENABLE_MPS_FALLBACK=1
% conda activate sd-api-server
% python3 server.py
結果・・
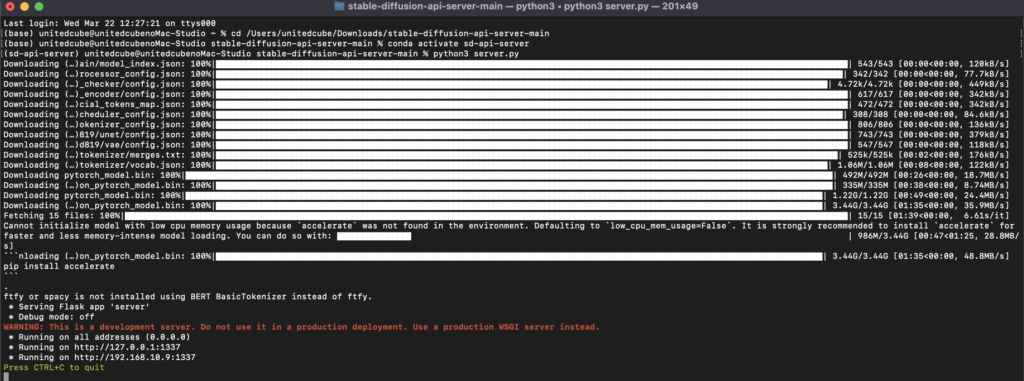
いけました!!
PhotoshopのAPIに localhost:1337 を設定して 接続できた。
そして次は画像が生成できない問題が・・ 次回に続く
画像生成エラーの解消
pytorchを以下より2.0にアップデートしてみる

pip3 install torch torchvision torchaudio
macOSも最新に。(mac OS Ventura 13.2.1)
condaをアップデート

conda update condaconda update --allconda update pythonconda update anaconda上記だとminiconda内でだめだったので入れ直し
Anaconda3-2023.03-MacOSX-arm64.pkg→OSに対応していない言われる
Anaconda3-2022.10-MacOSX-arm64.pkg→一個前の入った
もう一度上記のアップデート
最終的に
pip 23.0.1 from /opt/anaconda3/envs/sd-api-server/lib/python3.8/site-packages/pip (python 3.8)
・python3.8でいけた、3.9だとエラー?
・画像サイズ1024×1024だと下記エラーだった、512×512だといけた
/AppleInternal/Library/BuildRoots/c651a45f-806e-11ed-a221-7ef33c48bc85/Library/Caches/com.apple.xbs/Sources/MetalPerformanceShaders/MPSCore/Types/MPSNDArray.mm:705: failed assertion `[MPSNDArray initWithDevice:descriptor:] Error: product of dimension sizes > 2**31'
zsh: abort      python3 server.py
(sd-api-server) unitedcube@unitedcubenoMac-Studio stable-diffusion-api-server-main % /opt/anaconda3/envs/sd-api-server/lib/python3.8/multiprocessing/resource_tracker.py:216: UserWarning: resource_tracker: There appear to be 1 leaked semaphore objects to clean up at shutdown
  warnings.warn('resource_tracker: There appear to be %d '
コメント